Adding and Modifying User Settings
Users can be added and modified in the Cerberus FTP Server user database by opening up the User Manager and selecting the Users tab.
_774x488.jpg)
To add a user, click the New button from the button group along the right side of the page. A new user pop-up will appear. All usernames must be unique and are case-insensitive. Once you have entered the new username, continue filling out the remaining fields. The user can then be configured by clicking on the additional buttons above the details.
Individual User Settings
The additional buttons (Profile, Constraints, Authentication, and Allowed Protocols) The most commonly used of these properties are as followed:
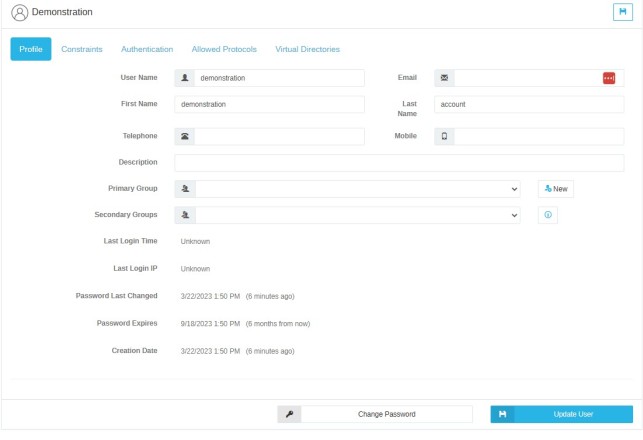
Profile Tab
-
Username The username this account will use to log in. (Required)
-
Email An email address to associate with the user account. This email address may be used as the 'from' address when creating public shares and the 'to' address when sending password reset emails. (Optional)
-
First Name, Last Name, Telephone, Mobile Optional Information fields for the user
-
Description A description field for the user account
-
Primary Group A Cerberus FTP Server Group that this user belongs to. All of the user's settings are overridden by the settings of the Primary Group.
-
Secondary Groups Additional Groups the user is assigned to in order to add access to additional virtual directories. User settings are NOT overridden by Secondary Groups, they merely grant the user access to the virtual directories assigned to the group.
-
Last Login Time The time that the user last logged into Cerberus FTP Server
-
Last Login IP The last recorded IP address that the user logged in from.
-
Password Last Changed The date when the user's password was last changed.
-
Creation Date The date when the user was created in Cerberus FTP Server
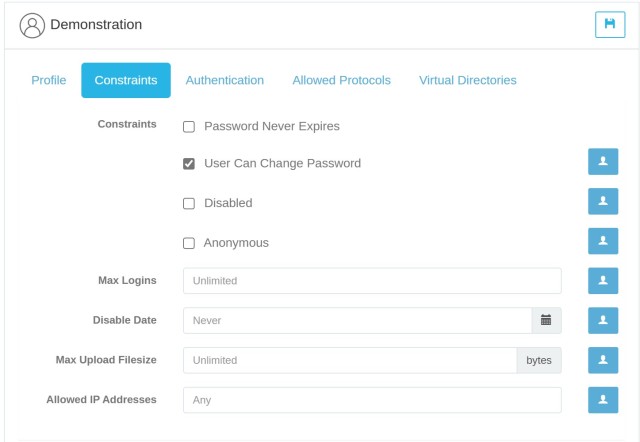
Constraints Tab
-
Password Never Expires If checked, the user's password never expires.
-
User Can Change Password Controls whether a user can change their password through the HTTP/S web client or through SSH SFTP or FTP commands.
-
Disabled Determines whether the account can log in or not. A disabled account cannot log in to the server.
-
Anonymous If checked, the user password is ignored and the user can be logged in using any password.
-
Max Logins The maximum number of connections this user can make to the server at the same time.
-
Disable Date If a date is set here then the account will become disabled after the date specified.
-
Note: The granularity of the timer is 30 minutes. The account will be disabled within 30 minutes of the time set.
-
-
Max Upload Filesize This field can be used to limit the maximum size of an uploaded file. This value defaults to unlimited. The file size is specified in bytes. Specify 0 or any non-positive value to reset the maximum file size to unlimited.
-
Allowed IP Addresses A comma-separated list of IP addresses that this user can log in from. If no IP addresses are specified then no per-user IP address filtering is enforced. IP addresses can be specified as a single IP, a range of IP addresses separated by a dash with no spaces, e.g. 192.168.0.100-192.168.0.150, or a CIDR-formatted IP address range. Adding spaces before and after the dash will invalidate the IP range. Multiple formats can be combined, with each single IP or range separated by a comma. Note, global IP address deny lists or allow lists are always enforced first, regardless of this setting.
Authentication Tab
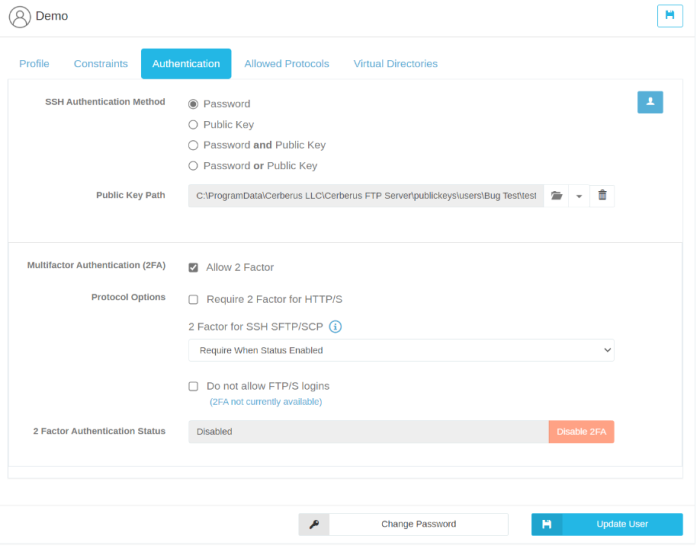
SSH Authentication Method Determines the authentication requirements for logging into an SFTP interface. Valid options are:
-
Password Only: Require only a password for authentication.
-
Public Key Only: Require only a valid public key for authentication
-
Public Key and Password: Require both a valid public key and a valid password for authenticating a user.
-
Public Key or Password: Require either a valid public key or a valid password for authenticating a user.
For more information on SSH Public Key Authentication, please refer to our support article Configuring a user for SSH Public Key Authentication
-
Multifactor Authentication (2FA) Determines if Two Factor authentication is allowed or required.
-
Allow 2 Factor This option allows users to set up 2FA if they choose to
-
Require 2 Factor for HTTP/S This makes 2FA a requirement when using the HTTP/S web client.
-
Require 2 Factor for SSH SFTP/SCP If a user has 2FA enabled, and has this option enabled, they will be required to enter the 2FA code while using SFTP/SCP.
-
2 Factor for SSH SFTP/SCP Controls the 2FA behavior for users when using the SFTP protocol.
-
Ignore: Cerberus will bypass the use of 2FA for SSH and SFTP/SCP protocols, regardless of the status of 2 2-factor authentication. In this case, the user will not be required to enter 2FA credentials. Please note, this is not a recommended option unless absolutely necessary. A “warning badge” will be visible in the Summary page if this setting is on for the user.
-
Require When Status Enabled: Cerberus will require 2FA for SSH and SFTP/SCP protocols provided the status of 2 Factor Authentication is “Enabled”. In other words, the user will be required to enter 2FA credentials if the status of 2FA is enabled. If the status of 2FA is disabled, the user will not be required to enter 2FA credentials.
-
Require: Regardless of the status of 2 Factor Authentication, Cerberus will expect 2FA authentication for that user. If the status of 2 Factor Authentication is “Enabled”, the user will be able to authenticate via 2FA. If the status of 2 Factor Authentication is “Disabled”, the user won’t be able to authenticate as they won’t have the 2FA credentials but Cerberus will still expect them for successful authentication.
-
-
Do not allow FTP/S logins (No 2FA) This option will not allow users to login via FTP/S when 2FA is enabled.
-
2 Factor Authentication Status Shows whether 2FA is currently enabled on the account.
-
Enabled User has enabled 2FA for their account. Once two-factor authentication is enabled for a user account you can disable it at any time by pressing Disable 2FA
-
Disabled User does not have 2FA enabled for their account.
-
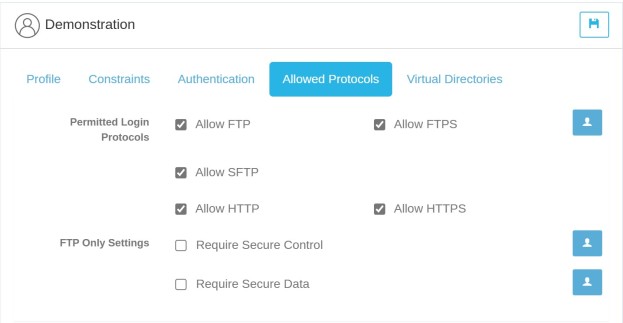
Allowed Protocols Tab
-
Permitted Login Protocols Controls which protocols a user is allowed to log in with. If a protocol is not checked then the user will not be allowed to log in using that protocol.
-
FTP Only Settings These settings only apply when the user logs in using FTP.
-
Require Secure Control If enabled, this user can only log in to the server using a secure TLS/SSL encrypted connection.
-
Require Secure Data If enabled, file transfers will only be allowed over secure TLS/SSL encrypted connections.
Virtual Directories Tab
Each user or group can be assigned different virtual directories. A virtual directory is added to a user or group account by using the User Manager.

To add a virtual directory to a user or group account, first:
-
Select the user in the Users or Groups list
-
On the user or group details for the selected user or group, click on the button labeled Virtual Directories.
-
Click New to open the Add A Virtual Directory window.
-
Add the path to the directory. You have three options to do this: Manually type the full path to the folder, use the folder select option to navigate to the directory you wish to add, or 'Create Folder'. If using the folder select option, select the folder you want using the navigation screen and press the "Select" button on the dialog box. If using the 'Create Folder' option, enter the root path to the location where you want the folder created, then add a backslash and the desired folder name.
-
Note: The Cerberus service account MUST have permission to create the folder in the root path. In all cases, the directory you selected will appear in the “Path” section. Cerberus will tell you if it believes 'the path exists' in green. If for some reason Cerberus can't find the path, or can't create the folder you will see 'The path does not exist' in red, and you will need to investigate why.
-
-
Enter a name for your Virtual Directory.
-
Next, select the permissions for your Virtual Directory. And then click Add
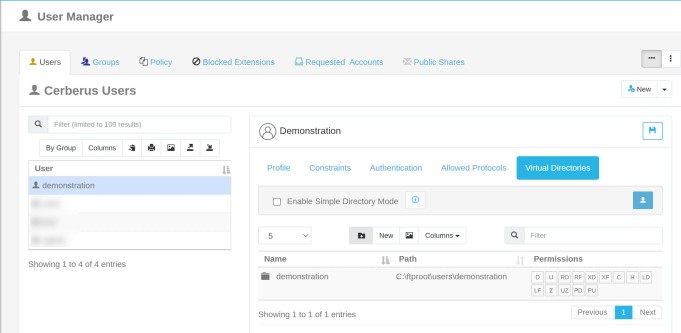
The directory should appear in the Virtual Root directory list box. To edit the newly added directory, click on the directory name in the list box. The Edit A Virtual Directory window should appear. After you have finished making changes to your virtual directory press the add button to save changes.